Tutorial: How to use TeamCity Powershell Runner to automatically deploy website
14 Dec 2013This tutorial is intended for .NET developers wishing to get started with deploying TeamCity builds via PowerShell.
First off, lets establish a definition for the following terms. These can be subjective so I will provide my sources. The list is a numbered list starting with the less involved practices.
- Continuous Integration - “is the practice, in software engineering, of merging all developer working copies with a shared mainline several times a day.” See Wikipedia
- Continuous Delivery - is the process of automating the delivery of sofware and includes practices such as automated testing, continuous integration. See Wikipedia
- Continuous Deployment - is really the same as continous delievery but implies that deploying releases to production. - See Continuous Delivery vs Continuous Deployment
Taking the first steps toward continuous integration
This is the just the start of a continuous integration solution. If you are already using TeamCity to manage builds then the next natural step is having your build server keep a server up to date with the latest committed code. This can be achieved through TeamCity’s Powershell Runner plugin. Powershell is very useful in automating windows tasks. In this example I will be showing how to setup a simple powershell script that will deploy a simple asp.net website to a remote server after a successful build.
Build Server Requirements
- You will need to give your build server elevated powershell Execution Policies or you will need to sign your powershell script for execution.
- IIS and the website must already be setup. This can be done with powershell but that is outside the scope of this demo.
- Assumes your website requires no config swapping. Unrealistic but the script can easily be adapted to handle swapping.
The PowerShell Script
Commit the following deployment powershell script to your Source Control. It will need to be in a directory accessible by the build server. I have mine a directly above the website in a scripts folder. The script is very specific to my example website but it should serve as a good example.
$target = $args[0]        # ie "\\testserver\e$"

# if you need to authenticate
net use $target "password" /USER:BuildServerUser

if (-not($target)) {
    Write-Output "You must provide a deployment location param as second item. Exiting!"
    Exit
}

Copy-Item 'SameWebsite\bin' "${target}\Websites\SampleWebsite\" -Force -Recurse
Copy-Item 'SameWebsite\Content' "${target}\Websites\SampleWebsite\" -Force -Recurse
Copy-Item 'SameWebsite\Scripts' "${target}\Websites\SampleWebsite\" -Force -Recurse
Copy-Item 'SameWebsite\Views' "${target}\Websites\SampleWebsite\" -Force -Recurse
Copy-Item 'SameWebsite\favicon.ico' "${target}\Websites\SampleWebsite\" -Force -Recurse
Copy-Item 'SameWebsite\web.config' "${target}\Websites\SampleWebsite\" -Force -Recurse
Copy-Item 'SameWebsite\*.asax' "${target}\Websites\SampleWebsite\" -Force -Recurse
The script performs the following:
- Uses the parameter args[0] to provide the script with the deployment destination.
- Copies the websites build artifacts to the deployment destination using relative paths.
- If you need credentials to copy files over the files you can use the net use command as indicated in the script.
- I added -verbose to the Copy-Item commands for detailed logging. The logs will show up in the TeamCity Build log.
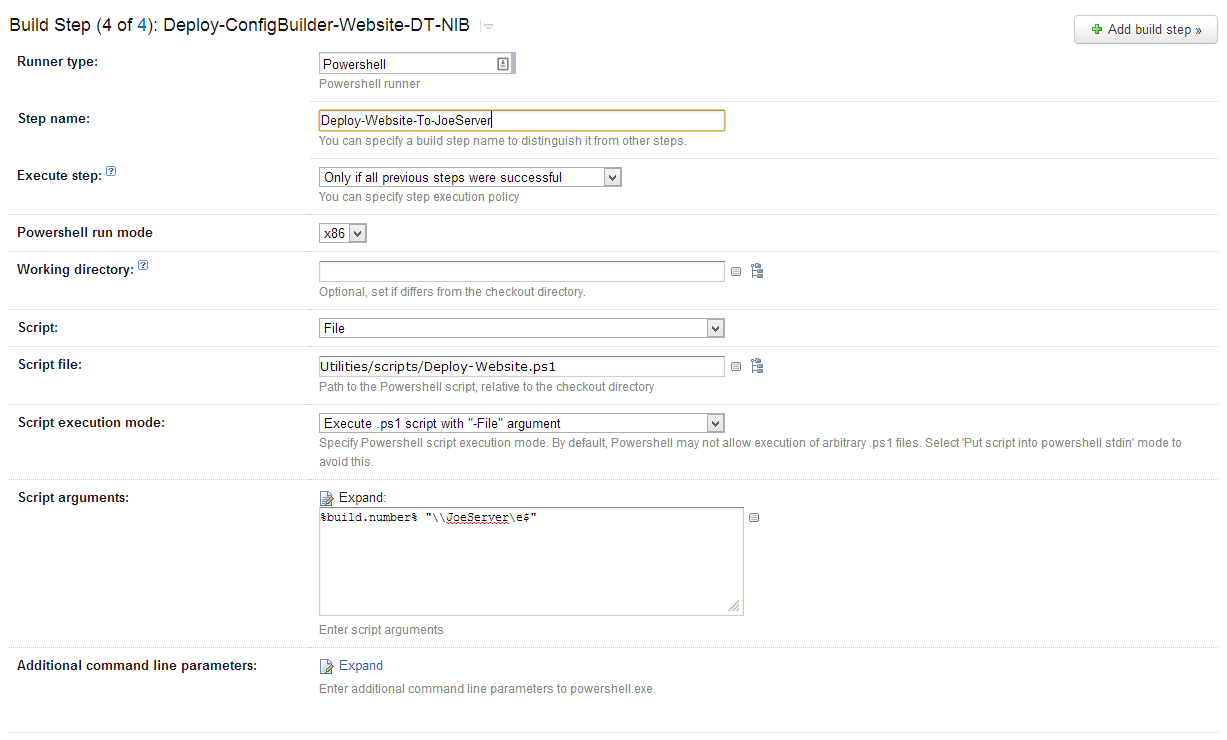
Create new Powershell runner Build Step via the TeamCity website
- You will want the script to run only after successful builds. It must be the last step since it requires the built files.
- See TeamCity’s terse documentation regarding PowerShell
- See my screenshot below to see some example settings.
- The screenshot references different project names. Yours will match
- Also you see I am passing two parameters in the screenshot. You will likely only need one.

Next steps in improving the process
- Email notifications and reports after deployment
- Automate the setup of IIS/Application
- Find a way to swap environment specific config items
I highly recommend the following blog posts on The Netflix Tech Blog